Ooooh boy. You’ve purchased and configured an SSL certificate on your hosting server for your website domain.
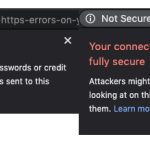
Yet, you do not see the desired white lock icon in your address bar. Instead, you see an upside-down exclamation point in a circle!
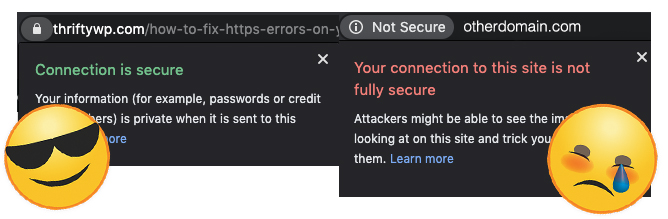
On further inspection, you are told that “Your connection to this site is not secure.”

What? Why not? You did all the right things! What the cow is going on here?
Well, let’s figure that out.
A “Your connection to this site is not fully secure” message usually means that the web browser has loaded both secure (https) resources as well as nonsecure (http) resources.
As it has not loaded 100% secure resources, it cannot display the lock icon.
Read on to learn how to diagnose the issue as well as find out how to fix it.
How To Use Your Browser Inspector
The first thing you want to do is figure out why the browser is displaying the error. To do so, you need to open up your browser inspector and look at the console.
This guide will focus on the Google Chrome browser. If you don’t have Google Chrome and would like to try it, click on that link to go to the download page.
Google Chrome dominates the web browser market at around 65% of web traffic at the time this article was written.
In Chrome or your browser of choice, right-click anywhere on your web page or the target webpage you want to diagnose.
Next, click on the “Inspect” link.
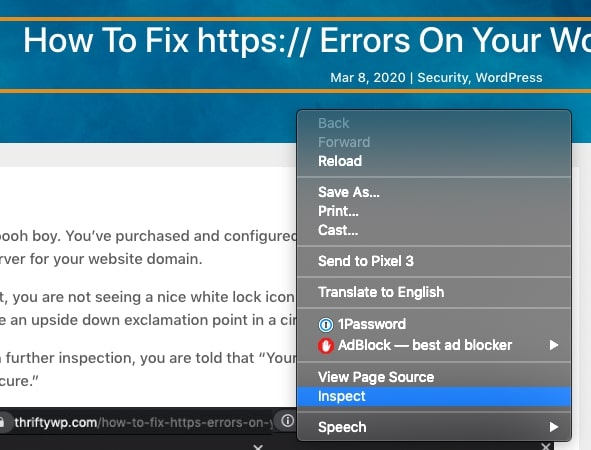
This will bring up the Dev Tools – inspector window. The window will be full of all sorts of useful information. However, we are only going to take a look at a couple of tabs to help us diagnose our https security issue.
Let’s first click on the “Security” tab in the Dev Tools – Inspector window. We want to make sure that our SSL certificate has loaded and is not the reason for the https issue.
The security tab should be the second tab from the right. If you instead see “>>” as the last tab, your browser window is not wide enough to display all of the tabs.
In this case, either grab the edge of your browser window and make it wider or, click on the “>>” tab which will produce a drop-down menu of the remaining tabs. Click on “Security.”
If your SSL certificate has loaded and is operating as it should, you’ll probably see something like the following.

Congratulations! It isn’t an issue with your SSL certificate.
Next, click on the second tab from the left titled “Console.”
On this tab, you’ll see a list of all of the issues and errors the browser has identified on the webpage you targeted.
Read on to learn to find the right information.
Look For https Specific Errors
There may be several issues/errors found by the browser on any specific webpage. Hopefully, this is not the case on your own website.
You are going to look for a specific error message on the console tab. It will say “Mixed Content: The page at ‘https://otherdomain.com/’ was loaded over HTTPS, but requested an insecure image ‘http://otherdomain.com/wp-content/uploads/2019/05/otherdomain-Logo.png’. This content should also be served over HTTPS.”

Wowzers. What does all of this mean? Basically, your website wants to load everything over the secure https protocol. However, some resources are not set to load over https. Darn.
This can happen for a variety of reasons, such as:
- You created your website without an SSL certificate, and later someone did the bare minimum to move your website to https (they pretty much only updated the home and site URL in WordPress)
- You have hard-coded URLs in your website files. Common occurrences are CSS file background URLs as well as fonts.
- Your theme loads the logo and favicon through its theme settings, which for some reason, are outside of the database and other theme files.
The https error in the console will point you in the right direction. Let’s see what info we can glean from the https errors listed above.
We see that each of the mixed content https issues all refer to the same logo file. That helps narrow it down. I know that the website is built on Divi and that Divi uses theme settings to place the logo URL.
With this information, I could fix the https issue by visiting the website theme options and updating the logo file URL to https.
Hopefully, your fix is this easy. If not, keep reading to learn how to fix your insecure resources.
Fix https Errors Using WP CLI Command Line
Quick note: Grab an export of your database before performing any of the following fixes. I’ve not had problems with the below methods, but you never know. Better to be safe than sorry.
My personal belief is to fix the problem at the root. Otherwise, you are just covering up the problem and hoping that it doesn’t resurface at some point in the future.
This method requires that you have root access to the server where your website is hosted. You will also need to be able to login to the server via ssh.
Your server must also have the WP CLI (WordPress Command Line Interface) interface installed.
Most major website hosts that I’ve used or worked with have WP CLI installed.
Once logged into the server via ssh, navigate to the root directory of your WordPress install. This should be the directory with your wp-config.php file in it. Then, simply enter the following command:
wp search-replace http:// https://This command will crawl through your database and replace all instances of “http://” with “https://”.
This method will usually fix any https issue that your browser has. However, there are sometimes exceptions.
Some themes pull in the website Logo and Favicon via theme specific pages.
If you still have an https error after running the above WP CLI search-replace command, inspect your webpage once again. If the issue references your logo or favicon image file, you simply need to update the file URL in your theme settings.
For example, the Divi theme sets the website logo in the theme options. The search-replace WP CLI command will not update the logo file URL. You must navigate to the Divi theme options to manually update the logo file URL.
Fix https Errors Using A Plugin
Quick note: Grab an export of your database before performing any of the following fixes. I’ve not had problems with the below methods, but you never know. Better to be safe than sorry.
Okay. Perhaps you don’t have root access to your hosting server. Or, perchance, you have no idea what SSH access is, how to turn it on, or how to create and upload a key to the server.
Understandable.
This option is usually just as good.
There are two different groups of plugins that can help you fix your website https issues:
- Those that update your database resource URLs similar to the WP CLI method explained above.
- Those that update the URL by some other means.
We’ll go over the different plugin options below.
Plugins That Update Your Database Resource URLs
These plugins allow you to perform the same search-replace as the WP CLI command.
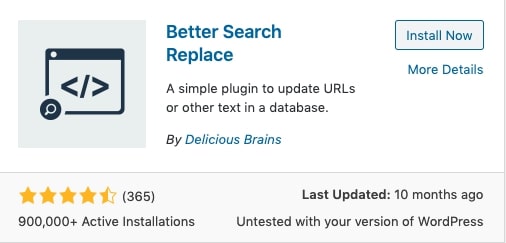
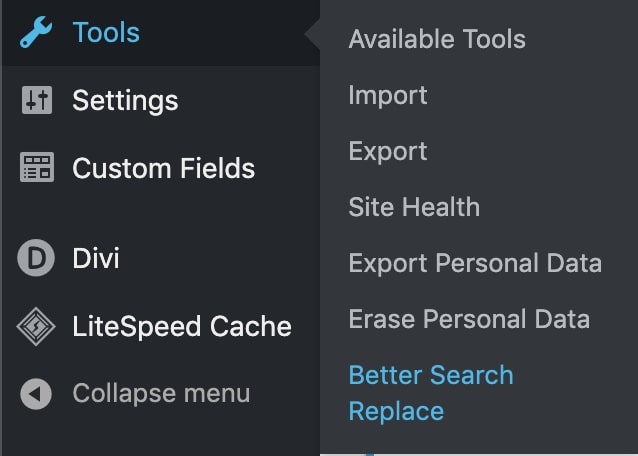
Better Search Replace
Install the plugin. Navigate to your plugins page, click on “Add New”, search for the plugin, then click “Install Now”. Activate the plugin.
Hext, hover on “Tools” in your dashboard menu. You should now see a link for “Better Search Replace.” Click that link.
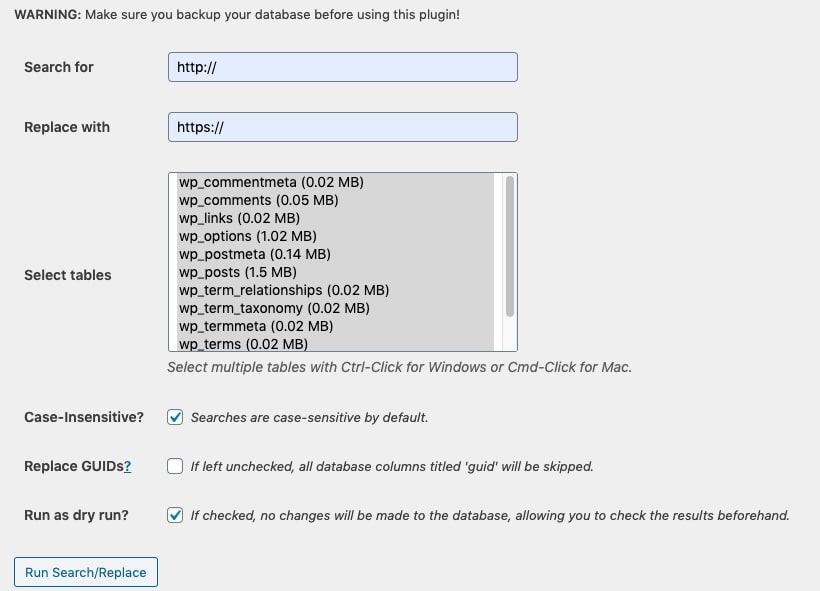
On the next screen, do the following:
- Search For: http://
- Replace With: https://
- Select Tables: Select all of the tables. You really only need to select the wp_posts and wp_postmeta tables, but select them all just in case there are some hidden http urls hiding in other tables (e.g. you are using other plugins that have their own database tables)
- Case-Insensitive?: Click the checkbox. You want to grab any case variations of http and https.
- Replace GUIDs: Leave this unchecked.
- Run as dry run?: Keep this checked. It will show you how many instances of your search show up in each table.
Click the “Run Search/Replace” button.
You’ll get the Dry Run results at the top of the page.

Click on the “Click here” link to see in what tables the update will run.
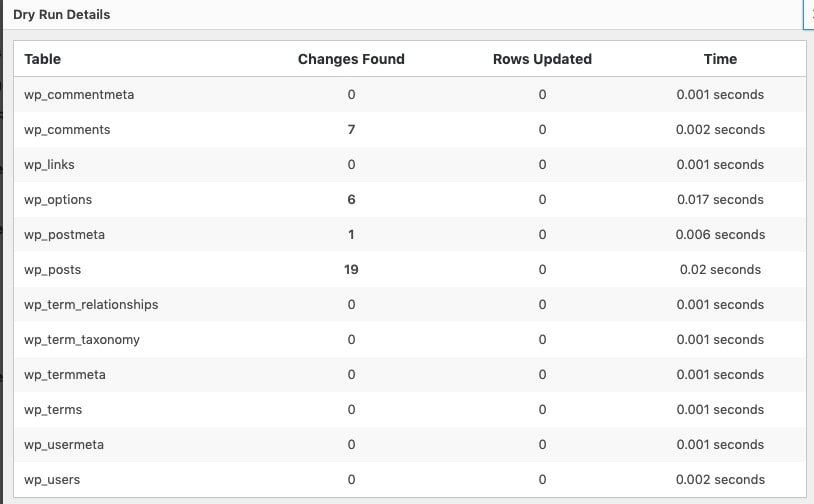
Look at that! There are instances of http in the wp_comments and wp_options tables as well! Good thing we selected all of the database tables!
If you are satisfied with the resulsts, scroll down to the bottom of the Better Search Replace settings page and uncheck the “Run as dry run?” checkbox.
Click the “Run Reach/Replace” button again.
Go back to your home page, clear your browser cache, and refresh your page. You should be set with the nice lock icon in the address bar! Hooray!
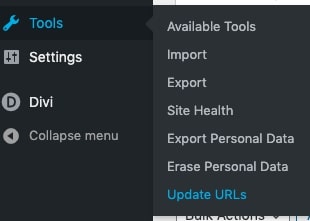
Velvet Blues
The process begins the same. Install the plugin. Navigate to your plugins page, click on “Add New”, search for the plugin, then click “Install Now”. Activate the plugin.
Hext, hover on “Tools” in your dashboard menu. You should now see a link for “Update URLs.” Click that link.
On the next screen, do the following:
- Old URL: http://
- New URL: https://
- URLs in page content ( posts, pages, custom post types, revisions ): Check the checkbox
- URLs in excerpts: Check the checkbox
- URLs in links: Check the checkbox
- URLs for attachments ( images, documents, general media ): Check the checkbox
- URLs in custom fields and meta boxes: Check the checkbox
- Update ALL GUIDs: DONT check the checkbox
See. Like this.
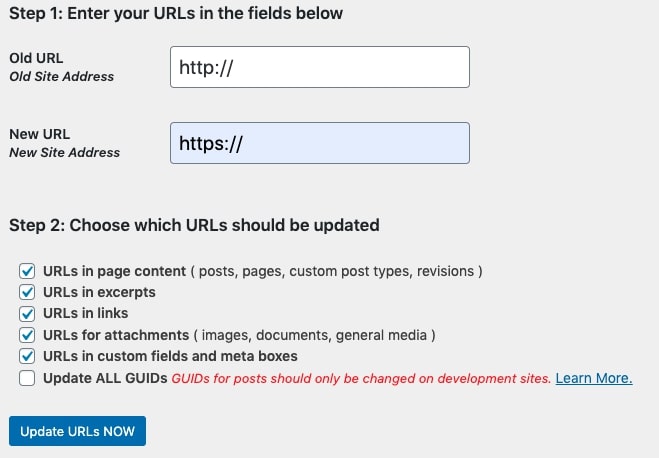
Once that is done, click the “Update URLs NOW” button.
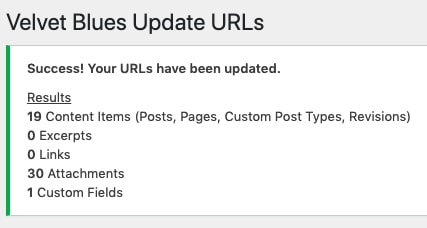
You’ll get a success report of what Velvet Blues was able to update.
Navigate to the webpage that was not fully secure, clear your browser cache, refresh the page and voila! You should now have the nice lock icon in your address bar.
Plugins That Update Your Database URLs by some other means
The above methods should cure what ales you. However, some https issues can be stubborn.
If you still aren’t seeing the lock icon in your address bar are still plagued by the circled upside-down exclamation point, read on! We’ll find a solution that works.
I do believe that the above solutions should be tried and implemented first. While the solutions that are presented below should work where the solutions above fail, the solutions above are addressing the root of the problem.
This next plugin will force all resources load via https regardless of what their URL says (except for hard-coded URLs in files – such as your style.css)
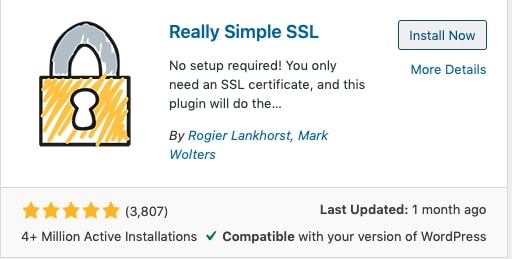
Really Simple SSL
As always, you need to install this plugin. Go to your plugins page, click on “Add New” and search for “Really Simple SSL.” Well done!
Go ahead and activate that bad rad.
You’ll then be presented with the following screen letting you know what it will and won’t fix. Again, if you have hardcoded URLs in your CSS or JS files, you’ll need to fix those manually.
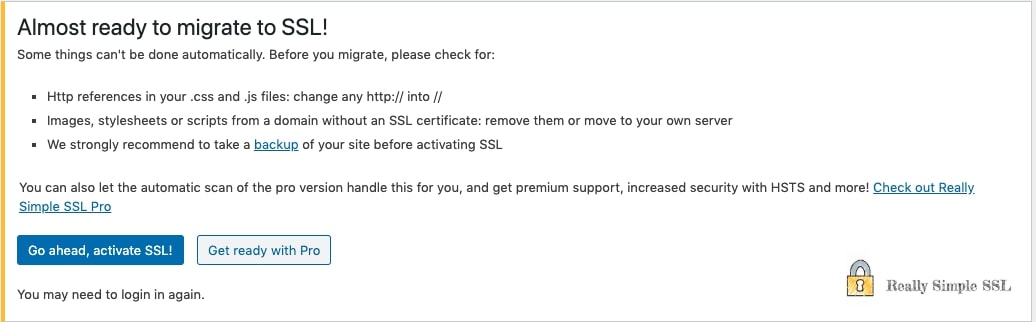
Ready? Click on the “Go ahead, activate SSL!” In most situations, that is all you will have to do! This plugin does wonders.
Why is that?
Click on the settings page on the next screen after activation. It will look like this. There are several settings here. We’ll just be writing about the first two. In most scenarios, you won’t have to mess with any other settings.
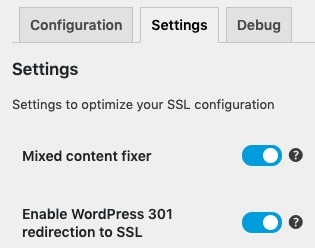
See that first setting? “Mixed content fixer”. That lil guy does wonders. It recognizes the mixed content your browser is loading and forces it to load via https! Awesome possum.
Conclusion
If you’ve made it this far, there is a 98% chance you’ve resolved your https issue.
Why do I believe that? Because these solutions have solved 98% of the https issues that I’ve encountered.
If you found this content useful, then perhaps leave a comment or something and be like “I found this content useful.” Then I’ll be like, “Awesome.”